![]()
![]()
![]()
![]()
| Basic User Interface > Grid and 3-D Cursor > User Defined Grid |
|
|
|
|
||
User defined grid
 |
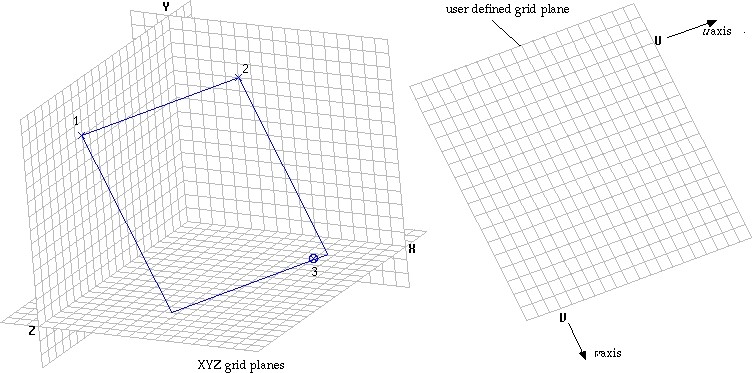
The system defined XYZ grid plane consists of three planes, i.e., XY, YZ and ZX planes which are respectively normal to Z, X and Y axes. User can define grid planes other than these ones. Their origin and their normal direction may be set arbitrarily as desired. It is very convenient, in some cases, to use these user defined grid planes for inputting curves or primitive surfaces. The user can register as many grid planes as necessary, and retrieve one of them for later use at any time. |
> Constructing user defined grid planes
A user defined grid plane can be constructed by the following steps:
|
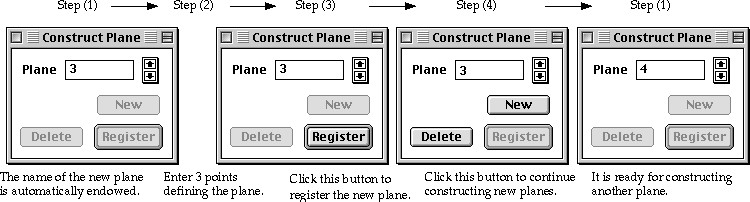
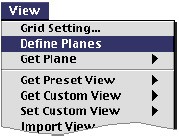
1) Select "Define Planes" item from |
|
| "Construct Plane" dialog appears on the screen, and "Plane" text item is filled with the name of the new plane to be constructed. | |
| This name is automatically endowed by VisualFEA, and can be modified as explained in "Renaming grid planes." | |
|
2) Enter 3 points which lie on the plane. |
|
| The first point is the origin of the plane, and the second
one together with the first one forms the u axis of the plane. The plane
is determined by the third point so that all the 3 points lie on the plane.
Another axis of the plane, i.e., v axis begins at the first point and is
directed normal to the v axis. The 3 points can be entered by either mouse
or keyboard. When all the 3 points are entered, |
|
|
3) Click |
|
|
The new grid plane is created and displayed on the screen. |
|
|
< "Construct Plane" dialog in each step of defining grid planes > |
|
|
4) Close the "Construct Plane" dialog in order to end constructing
grid planes and start entering coordinates using the grid planes. Or,
click |
|
| If you click |
|
< Construction of user defined grid planes >
> Retrieving user defined grid planes
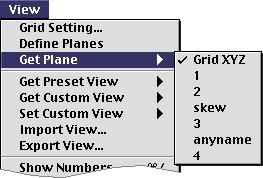 |
The user defined grid planes as well as XYZ grid plane can be retrieved
at any time for use in entering coordinates data. When a grid plane is
constructed and re gistered, the name of the plane is added to the items
of |
| The user defined grid planes are saved together with the VisualFEA data file, and so can be used when the file is opened in later sessions. |
> Retrieving XYZ grid planes
The system defined XYZ grid plane can also be retrieved by selecting "Grid
XYZ" item which is always on the top of the ![]() submenu.
submenu.
> Deleting grid planes
User defined grid planes can be deleted by the following steps.
|
1) Select "Define Planes" item from |
|
|
"Construct Plane" dialog appears on the screen, and "Plane" text item is filled with the name of the new plane to be constructed. |
|
| 2) Scroll the effective plane using |
|
| 3) Click |
|
|
When the deleted plane disappears on the screen, and the effective plane scrolls forward to the next, or scrolls back if next one does not exist. |
> Renaming grid planes
The name of a user defined grid plane is automatically endowed by VisualFEA in the form of "1", "2", "3" and so on. This can be changed to other name, usually for better identification. Renaming is achieved simply by editing "Plane" text box of " Construct Plane" dialog, while the plane is being created. But, you may sometimes want to change the name later. In this case, follow the steps described below.
|
1) Select "Define Planes" item from |
|
|
"Construct Plane" dialog appears on the screen, and "Plane" text item is filled with the name of the new plane to be constructed. |
|
|
2) Scroll the effective plane using |
|
|
The plane displayed on the screen is effective. |
|
|
3) Click "Plane" text box,or select the string of the name. |
|
| 4) Change the string of the name. | |
| As you change the name, the string of the |
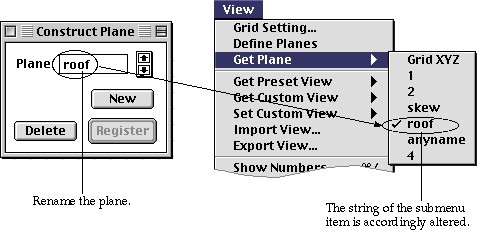
< Renaming grid planes >
|
|
|
|