![]()
![]()
![]()
![]()
| Curves and Surface Primitives > Handling Curves and Surface Primitives > Duplicating curves and surface primitives |
|
|
|
|
||
Duplicating curves and surface primitives
It is sometimes convenient to create objects by duplicating the selected objects. The final position or orientation of the duplicated objects may be set by moving, revolving or mirroring. The nodes on divided curves are automatically duplicated together with their mother curves.

> Duplicating curves and surface primitives, and moving
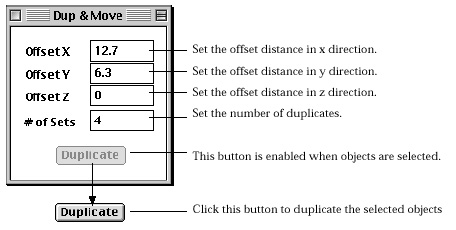
You may make as many duplicates of the selected curves or surface primitives as you want, and position them with specified offset distance by the following procedures.
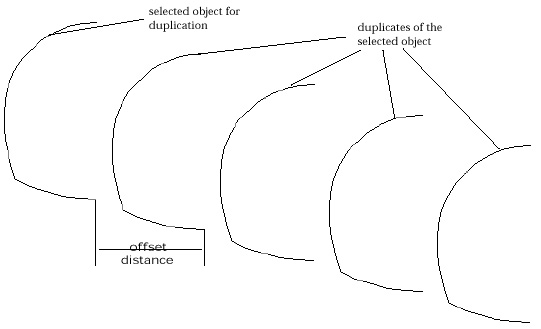
<Duplicating the selected curves and moving >
> Duplicating curves and surface primitives, and revolving
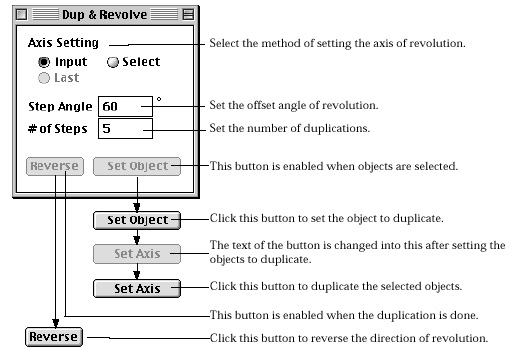
You may set the position and the orientation of the duplicates by revolving them about a specified axis by the following procedures.
When a duplication process is completed, ![]() button
is also enabled. The orientation of revolution can be reversed by clicking
button
is also enabled. The orientation of revolution can be reversed by clicking ![]() button.
button.
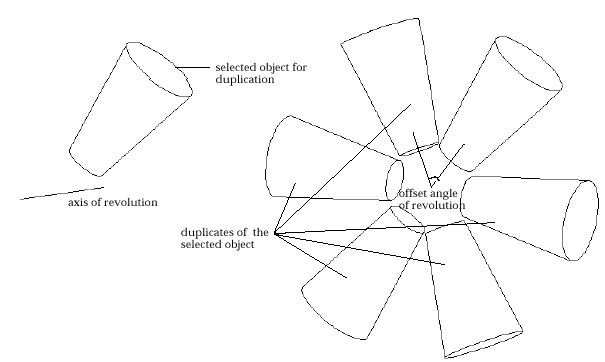
< Duplicating a surface primitive and revolving >
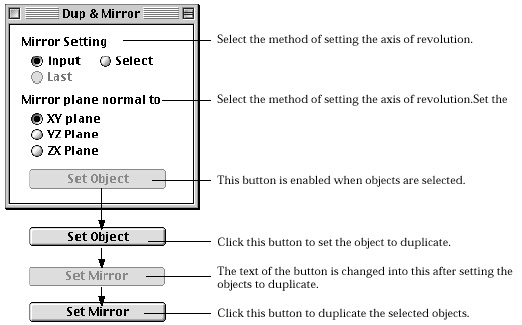
> Mirroring curves and surface primitives
Duplicate of selected objects can be created by mirroring them.
| 1) Choose "Mirror" from |
||
| One of the selection tools is activated if not currently, and "Dup and Mirror" dialog box appears. | ||
 |
||
| 2) Select the method of setting the mirror. | ||
| The mirror plane for duplication may be set by one of the following 3 methods. | ||
| Input : input the mirror plane by entering a new straight line just as creating a new line. | ||
| Select : select an existing straight line. | ||
| Last : apply the mirror plane which was applied in the last duplication. | ||
| The "Last" button is enabled only when "Duplicate and Mirror" is processed at least once. | ||
| 3) Select the plane normal to the mirror One of xy, yz and zx coordinate planes should be selected. The mirror plane is determined by this plane and the line as described in step 6). The mirror is normal to this plane and contains the line. | ||
| 4) Select the curves or surface primitives to duplicate. | ||
| Click the selection tool corresponding to the type of objects
to duplicates, and select the objects. The initially dimmed |
||
| 5) Click |
||
| The selected objects are set for duplication. The text of
the button is changed into |
||
| 6) Input or select a straight line, which defines the mirror plane normal to the plane selected in step 3). | ||
| Input or select a straight line depending on the "Mirror
Setting." The mirror plane is defined so that the line is on the plane.
Then, |
||
| 7) Click |
||
| The duplication is processed, and the text of the button
is changed into |
||
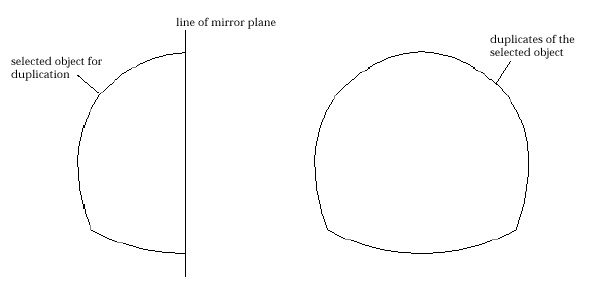
< Mirroring a curve >
> Modifying a curve or a primitive with its duplicate
Instead of modifying the selected curve or a primitive, you may modify its duplicate. Press option key and follow the steps described in "Moving contro l points by mouse. " A duplicate of the curve or primitive is created prior to modification process. The original curve or primitive is intact, and its duplicate is modified.
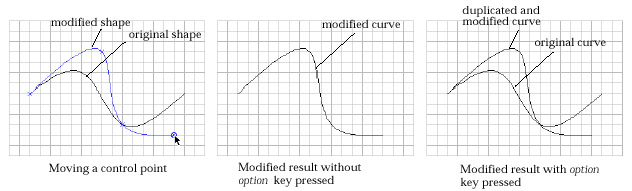
< Modifying a curve or its duplicate >
> Modifying attributes of a primitive surface
There are a few kinds of surface primitives whose attributes may be modified. Namely, they are spheres, cylinders (including cones and truncated cones) and tori. If you click a surface primitive of these types under modification mode, a dialog box appears on the screen. The dialog box has editable text item(s) for editing attributes. The shape of the surface primitive is immediately modified by editing these text items.
|
|
|
|